In simple words, Interferometry is nothing but the use of optical interference to carry out precise measurements of very small linear dimensions of slip gauges. The interferometer works on the same basic principle as that of an optical flat. In the previous article, we have discussed what is Interferometry in Metrology, in this article we are going to discuss Different Interferometers in Metrology.

Interferometers
For Very small linear measurements, Interferometers are used. Interferometers are optical instruments that are used for very small linear measurements. The most commonly known application is that the interferometers are used for verifying the accuracy of slip gauges and measuring flatness errors.
As we have mentioned that the interferometer works on the same basic principle as that of an optical flat, it is additionally provided with arrangements in order to control the lay and orientation of fringes. It is also provided with a viewing or recording system, which eliminates measurement errors.
Different Interferometers in Metrology
There are mainly 3 different Interferometers available in metrology
- NPL Flatness Interferometer
- Pitter–NPL Gauge Interferometer
- Laser Interferometers
These are the very well-known Interferometers in metrology. Let us discuss each of them.
1. NPL Flatness Interferometer

- NPL Flatness Interferometer is developed by the National Physical Laboratory of the United Kingdom.
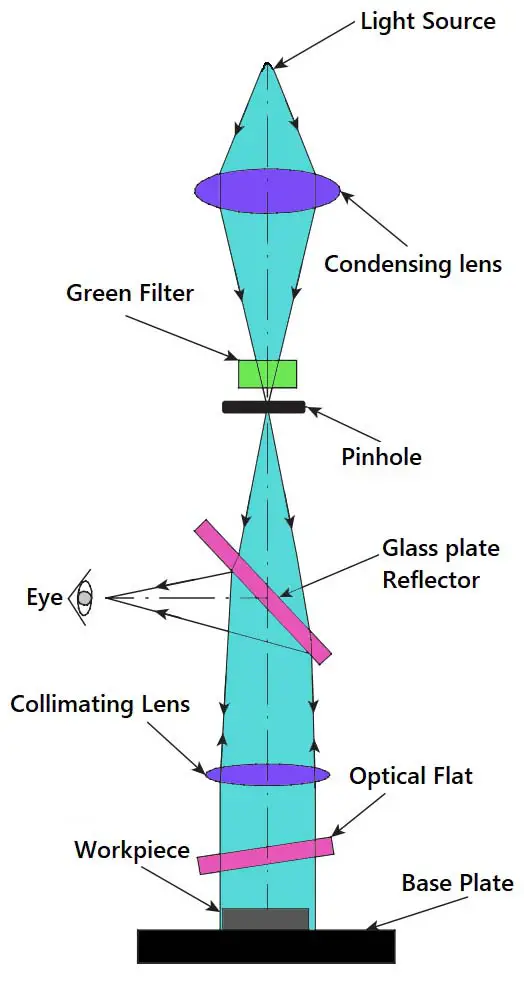
- The NPL Flatness Interferometer comprises a simple optical system, which provides a sharp image of the fringes to allow the user to view them.
- The light from a mercury vapour lamp is condensed and passed through a green filter, resulting in a green monochromatic light source.
- The light will now pass through a pinhole, giving an intense point source of monochromatic light.
- The pinhole is positioned such that it is in the focal plane of a collimating lens.
- Therefore, the collimating lens projects a parallel beam of light onto the face of the gauge to be tested via an optical flat. This results in the formation of interference fringes.
- The light beam, which carries an image of the fringes, is reflected and directed by 90° using a glass plate reflector.
- The entire optical system is enclosed in a metal or fibreglass body.
- It is provided with adjustments to vary the angle of the optical flat, which is mounted on an adjustable tripod.
- In addition, the base plate is designed to be rotated so that the fringes can be oriented to the best advantage.
Read the full article: NPL Flatness Interferometer
2. Pitter–NPL Gauge Interferometer

- Pitter–NPL Gauge Interferometer is one of the interferometers in metrology used for determining actual lengths of slip gauges.
- Since the measurement calls for a high degree of accuracy and precision, the instrument should be used under highly controlled physical conditions.
- It is recommended that the system be maintained at an ambient temperature of 20°C, and a barometric pressure of 760mmHg with a water vapour pressure of 7mm, and contain 0.33% by volume of carbon dioxide.
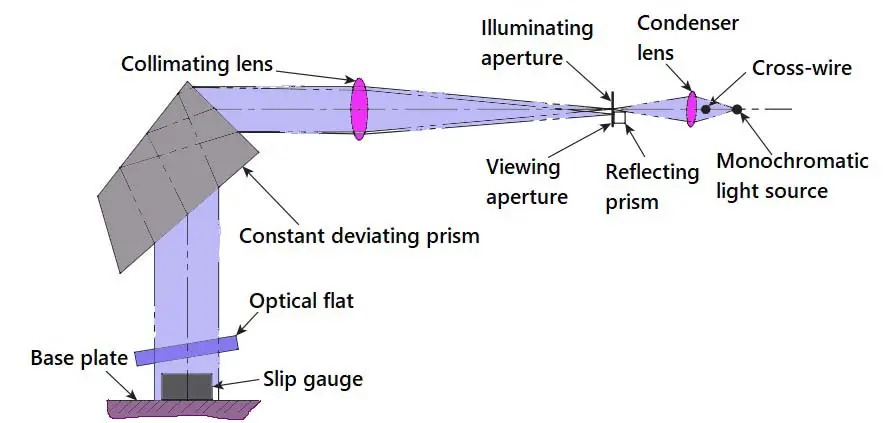
- Light from a monochromatic source (the preferred light source is a cadmium lamp) is condensed by a condensing lens and focused onto an illuminating aperture.
- This provides a concentrated light source at the focal point of a collimating lens.
- Thus, a parallel beam of light falls on a constant deviation prism.
- This prism splits the incident light into light rays of different wavelengths and hence different colours.
- The user can select a desired colour by varying the angle of the reflecting faces of the prism relative to the plane of the base plate.
- The prism turns the light by 90° and directs it onto the optical flat.
- The optical flat can be positioned at a desired angle by means of a simple arrangement.
- The slip gauge that is to be checked is kept right below the optical flat on top of the highly flat surface of the base plate.
- The lower portion of the optical flat is coated with a film of aluminium, which transmits and reflects equal proportions of the incident light.
- The light is reflected from three surfaces, namely the surface of the optical flat, the upper surface of the slip gauge, and the surface of the base plate.
- Light rays reflected from all the three surfaces pass through the optical system again; however, the axis is slightly deviated due to the inclination of the optical flat.
- This slightly shifted light is captured by another prism and turned by 90°, so that the fringe pattern can be observed and recorded by the user.
Read Full Article: Pitter–NPL Gauge Interferometer
3. Laser-Based Interferometers
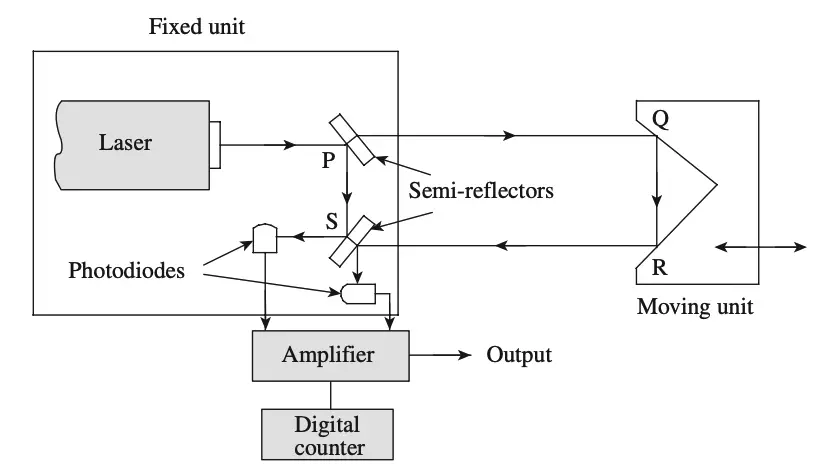
Laser Interferometer is one of the interferometers which uses laser means and electronic controls to carry out the inspection of machine parts for straightness, parallelism, and flatness, and measurement of very small diameters, among others, and also to Calibrate slip gauges.

- Laser-based Interferometers are becoming increasingly popular in metrology applications in recent times.
- Traditionally, lasers were more used by physicists than engineers, since the frequencies of lasers were not stable enough.
- However now, stabilized lasers are used along with powerful electronic controls for various applications in metrology. Gas lasers, with a mixture of neon and helium, provide perfectly monochromatic red light.
- Interference fringes can be observed with a light intensity that is 1000 times more than any other monochromatic light source.
- However, even to this day, laser-based instruments are extremely costly and require many accessories, which hinder their usage.
- More importantly, from the point of view of calibration of slip gauges, one limitation of laser is that it generates only a single wavelength.
- This means that the method of exact fractions cannot be applied for measurement.
- In addition, a laser beam with a small diameter and high degree of collimation has a limited spread.
- Additional optical devices will be required to spread the beam to cover a larger area of the workpieces being measured.
- In interferometry, laser light exhibits properties similar to that of any ‘normal’ light.
- It can be represented by a sine wave whose wavelength is the same for the same colors and amplitude is a measure of the intensity of the laser light.
- From the measurement point of view, laser interferometr can be used for measurements of small diameters as well as large displacements.
Read the Full Article: Laser-Based Interferometer
Conclusion
We have only discussed the construction of the different Interferometers the NPL Flatness Interferometer, Pitter–NPL Gauge Interferometer, and Laser Interferometers. The working principle and working examples are explained in each individual article. Please follow the respective article links to learn more about these different interferometers. Let us know what do you think about this article in the comment section below.

Leave a Reply