We generally utilize microscopes in science and medicine. It is also a metrological tool of the most fundamental importance and the greatest integrity. The Holmarc’s Tool maker’s microscope is a multi-functional measuring instrument used in metrology for inspection and measurement of miniature mechanical and electronic parts and tools.

Tool maker’s microscope provides a high degree of magnification, and is also a simple and convenient means for taking readings. This enables the Tool Maker’s Microscope both absolute and comparative measurements. First, we need to understand the basic principle of a Microscope.
The basic principle of Microscope
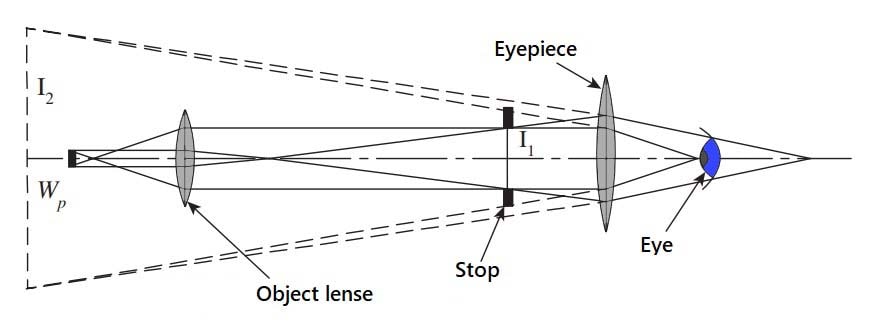
There will be two stages of magnification coupled in the microscope. The first magnification is at the Objective lens and the second magnification s at the eyepiece. The objective lens forms an image of the workpiece at I1 at the stop. The stop frames the image so that it can be enlarged by the eyepiece. Viewed through the eyepiece, an enlarged virtual image I2 is obtained. The magnification at each stage will be multiplied. Thus, a highly effective magnification can be achieved in the microscope with only moderate magnification at each stage.

In metrology we use many microscopes, Among them, the tool maker’s microscope is the most familiar one. The tool maker’s microscope is a multifunctional device that is primarily used for measurement on factory shop floors. Designed with the measurement of workpiece contours and inspection of surface features in mind, a tool maker’s microscope supports a wide range of applications from shop-floor inspection, and measurement of tools and machined parts to precision measurement of test tools in a measuring room. The main use of a tool maker’s microscope is to measure the
shape, size, angle, and position of small components that fall under the microscope’s measuring range.
Construction and Working of Tool Maker’s Microscope
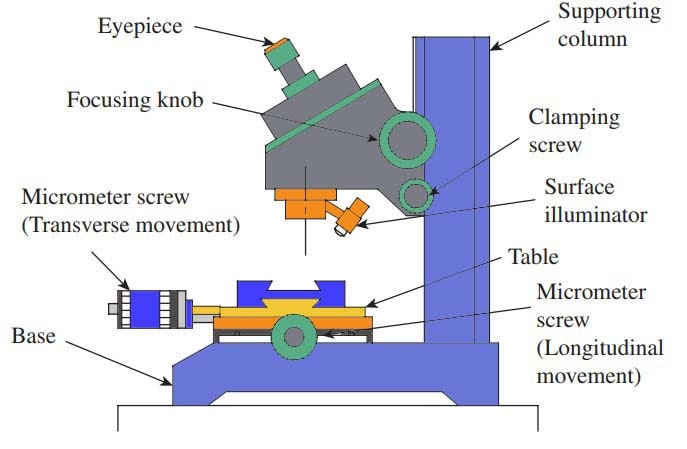
- It features a vertical supporting column, which is robust and carries the weight of all other parts of the microscope.
- It provides a long vertical working distance.
- The workpiece is loaded on an XY stage, which has a provision for translatory motion in two principal directions in the horizontal plane.
- Micrometres are provided for both X and Y axes to facilitate linear measurement to a high degree of accuracy.
- The entire optical system is housed in the measuring head.
- The measuring head can be moved up and down along the supporting column and the image can be focused using the focusing knob.
- The measuring head can be locked into position by operating the clamping screw.
- An angle dial built into the eyepiece portion of the optical tube allows easy angle measurement.
- A surface illuminator provides the required illumination of the object so that a sharp and clear image can be obtained.

- The element that makes a microscope a measuring instrument is a reticle.
- When the image is viewed through the eyepiece, the reticle provides a reference or datum to facilitate measurement.
- Specialized reticles have been developed for precise settings.
- A typical reticle has two ‘crosswires’, which can be aligned with a reference line on the image of the workpiece.
- In fact, the term ‘cross-wire is a misnomer, because modern microscopes have cross-wires etched on glass.

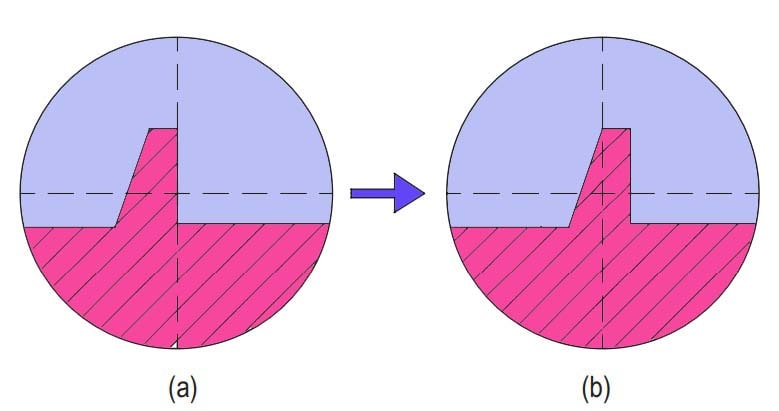
(a) Reading R1
(b) Reading R2
- The above schematic diagram illustrates the procedure for linear measurement.
- A measuring point on the workpiece is aligned with one of the cross-wires and the reading R1 on the microscope is noted down.
- Now, the XY table is moved by turning the micrometre head, and another measuring point is aligned with the same cross-wire. The reading, R2 is noted down.
- The difference between the two readings represents the dimension between the two measuring points.
- Since the table can be moved in two mutually perpendicular directions (both in the longitudinal as well as transverse directions) using the micrometres, a precise measurement can be obtained.
- In some tool maker’s microscopes, instead of a micrometre head, vernier scales are provided for taking readings.
- The reticle is also inserted into the eyepiece mount.
- A positioning pin is provided to position the reticle accurately.
- A dioptre adjustment ring is provided in the eyepiece mount to bring the cross-wires of the reticle into sharp focus.
- The measuring surface is brought into focus by moving the optical tube up and down, with the aid of a focusing knob.
- Looking into the eyepiece, the user should make sure that the cross-wires are kept in ocular focus during the focusing on the operation.
- The positioning of the workpiece on the table is extremely important to ensure accuracy in measurement.
- The measuring direction of the workpiece should be aligned with the traversing direction of the table.
- While looking into the eyepiece, the position of the eyepiece mount should be adjusted so that the horizontal cross-wire is oriented to coincide with the direction of the table movement.
- Now, the eyepiece mount is firmly secured by tightening the fixing screws.
- The workpiece is placed/clamped on the table and the micrometre head is turned to align an edge of the workpiece with the centre of the cross-wires.
- Then, the micrometre is operated and the moving image is observed to verify whether the workpiece pavement is parallel to the measuring direction.
- By trial and error, the user should ensure that the two match perfectly. Most tool makers microscopes are provided with a surface illuminator.
- This enables the creation of a clear and sharp image. Out of the following three types of illumination modes that are available, an appropriate model can be selected based on the application.
Contour illumination:
This type of illumination generates the contour image of a workpiece and is suited for measurement and inspection of workpiece contours. The illuminator is equipped with a green filter.
Surface illumination:
This type of illumination shows the surface of a workpiece and is used in the observation and inspection of workpiece surfaces. The angle and orientation of the illuminator should be adjusted so that the workpiece surface can be observed under optimum conditions.
Simultaneous contour and surface illuminations:
Both contour and surface of a workpiece can be observed simultaneously. Some of the latest microscopes are also provided with angle dials to enable angle measurements. Measurement is done by aligning the same cross-wire with two edges of the workpiece, one after the other. An angular vernier scale, generally with a least count of 6, is used to take the readings.
Applications of Tool Maker’s Microscope
- It is used in shop floor inspection of screw threads, gears, and other small machine parts.
- Its application includes precision measurement of test tools in tool rooms.
- It helps determine the dimensions of small holes, which cannot be measured with micrometres and callipers.
- It facilitates template matching inspection. Small screw threads and involute gear teeth can be inspected using the optional template reticles.
- It enables inspection of tapers on small components up to an accuracy of 6.
Conclusion
These are the complete details regarding the tool maker’s microscope, construction and working principle. In the previous article, we have discussed the different Optical Measurement Techniques such as the profile projector and the optical squares.

Tool maker’s microscope is a multi-functional measuring instrument machine, big size microscope