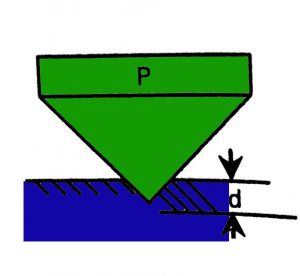
The ability of a material to resist indentation or penetration is called Hardness. To test the hardness of any material is simply forcing an indentor into the surface of the metal by applying the load. There are different methods are developed to test this hardness. In the previous article we have discussed The Brinell Hardness test, this article, we are going to discuss one of the hardness testing method called Rockwell Hardness Test.
Rockwell Hardness Testing
- Rockwell hardness test consists of indenting(Trying to make a notch) to the surface of the metal by a Hardened steel ball/Diamond cone Indenter under load.
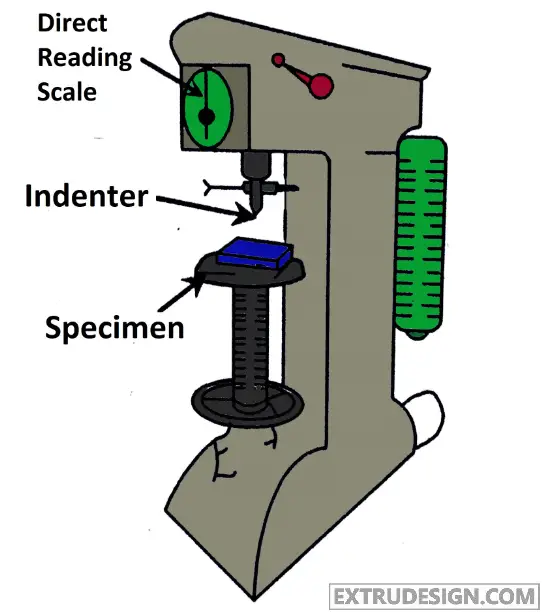
- See the schematic representation of the Rockwell hardness testing machine.
- The indenter will be locked on the upper head of the Rockwell hardness testing machine as shown in fig.
- The minor load will be applied with the help of the Lever system on to the specimen first to take out any slack in the machine and take this reading as zero.
- Then after the major load is applied to make an indent.
- As the major load applied on the upper head with the indenter on to the spacemen, there will be an indent on the specimen.
- The principle of the Rockwell hardness test is that both Hardened steel ball and Diamond cone will be used as the indenter. It is pressed into the specimen to make the indent in the specimen by applying minor and the major load.
- In the Rockwell test, we use the depth of the penetration to determine the hardness of the material rather than the surface area to determine the hardness. (In Brinell test we use the surface area of indent to determine the hardness).
- But the Formula to determine the Rockwell Hardness number(Rhn) is little different here! (There is a dial indicator for the Rhn on the Rockwell hardness testing
 machine itself as you can see it in the machine figure.
 - This dial on the machine will directly give the Rockwell Hardness Number.
- There are two scales used on this dial to determine the hardness based on the soft materials and hard materials.
Rockwell Scale – B-scale
- B-scale which is in red colour to represent the reading for the soft materials.
- Used for Test the soft materials and gives the direct Rockwell Hardness Number (Rhn)
- In this Soft material testing, Hardened steel ball will be used as the indenter.
Rockwell Scale – C-scale
- C-scale, which is in Black colour represents the reading for the Hard materials.
- Used for Test the Hard materials and gives the direct Rockwell Hardness Number (Rhn)
- In this Hard material testing, Diamond cone will be used as the indenter.
Limitations of Rockwell Hardness Test
- Due to Indent on the specimen or the testing component, this method is not suitable for the Finished products. Even though the indent impression is comparatively small when compared to the Brinell Hardness Test.
- The Rockwell hardness number (Rhn) must be specified with the scale name as prefix all the times.
Precautions in Rockwell Hardness Testing
- Before we test, we have to clean the surface from dirt.
Advantages of Rockwell Hardness Testing Machine
- Can be used for the wide range of materials due to the hard material testing also possible.
- It is particularly useful for the routine tests as the size of the impression is small.
Conclusion
We have discussed how the test is conducted and the principle of the Rockwell hardness test. and also we have discussed the precautions that we have to take before we begin the test. The limitations of the Rockwell Hardness test and the advantages of this testing machine also explained. If you have any thoughts, please let us know in the comment sections below.


Nice post! The article helped me understand various hardness tests useful for comparing different treatments or materials.
Glad to know that!