Modelling in Creo 6.0 could be fun until we face a situation in large assemblies where we need Convert Sub-Assembly into a part. Figuring out this can be pretty frustrating if we do not know exactly what feature we need from Creo 6.0. We know Creo is one the best CAD software for engineers who work with large assemblies and also a wide variety of families of products with different sizes and types.
For people new to Creo, PTC Creo is a family or suite of CAD software, that supports product design for discrete manufacturers and is developed by PTC.

As I have mentioned that Convert Sub-Assembly into a part in Creo can be done with a simple command called “Shrinkwrap“
Shrinkwrap

The shrinkwrap feature in Creo can be used to create solid geometry and depending on the quality level you choose, the part can be identical, internally and externally, to the original model. It is definitely the easiest method if you want to convert the assembly into a part in Creo.
In some cases This feature is unavailable (Greyed out in the feature ribbon). If the option isn’t available, there is some problem with the original model such as it contains surface models or has some sort of geometry that can’t be converted. And also if there are any errors also it can happen that this Shrinkwrap feature will be unavailable. Please fix that.
Alternatively, Other options such as the external merge/inheritance (may be an option not available to all), merge (creates a reference to the original model and a merging part in the original model) and using a step export and re-import with the option to make as a single part but all the assembly references might be fail.
Converting with Shrinkwrap
Let us see how we can convert a subassembly into a single part with Shrinkwrap.
- Use the File > Save as > Save a Copy command to save the assembly with the Type Shrinkwrap
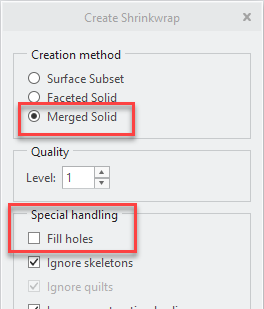
- Then select the Merged Solid option.
- You can increase the Quality and also uncheck the box to Fill holes if you want to keep some more details.

Quality Level smaller value gives creo to collect less number of surfaces and results in smaller size files and improves the performance of the system while handling the large assemblies.
Note: Please note that in order to save this type of large assembly with the shrink-wrapped subassemblies, you need to have Advanced Assembly Extension(AAX) or Pro/ASSEMBLY module or Assembly Performance Extension(APX) required to save the model as a shrinkwrap model.
Advantages with Shrinkwrap
- With shrinkwrap, we can handle complex and larger assemblies by representing the subassemblies of buyout components with one lightweight part and simplifying the components as single parts such as bearing and other buyout components.
- Improve system performance with large assemblies (Shrinkwrap models load faster than complex models).
- Provide an accurate external representation of the model for use by other design teams, suppliers, or customers, without disclosing the model’s internal design. Others can visualize the product and conduct space claim studies, form and fit studies, interference checking, and so forth, while you protect trade secrets, patented designs, and other proprietary information.
- Control and handle the amount of information included in the model:
- Close holes and gaps.
- Control the level of detail.
- Assign exact mass properties from the original model.
- Include additional datum geometry referenced from the original model.
- We can also export the models to standard formats, such as IGES, STEP, and VRML.
- Use as standard assembly components.
- Produce a visualization of complex assemblies using tools such as Windchill and the Web.
Converting with STEP/IGES
In case you do not want to use the Shrinkwrap feature or you do not have the licence for the above-mentioned modules to access the shrinkwrap features, still, you can Convert Assembly into a part with STEP or IGES.
- You can also export the assembly to another file format like STEP / IGES or Neutral and import it back as a part
- Use the File > Save as > Save a Copy command to save the assembly with the Type of your choice
- Then use the File > Open command to browse All Files Type to retrieve the newly created file
- If selecting STEP file format you may need to set the hidden config.pro option intf3d_in_as_part to yes to avoid misplaced components.
Converting with Inseparable Assemblies
With the latest version of Creo 8.0 Inseparable Assemblies with Embedded Components have been introduced and this feature is amazing and a life saviour for engineers who deal with very complex assemblies with many small components.
Inseparable assemblies allow you to create a single file for a multi-component assembly. The common use for an inseparable assembly is a purchased component that you want to include in your model. This component is not expected to undergo frequent changes, but you need to include it, reference it, place it, and so on in the assembly. An inseparable assembly is a single business object that you can easily manage.
You can access this feature In Assembly mode, click Model > Operations > Inseparable Assemblies.
Inseparable Assemblies allow you to perform the following tasks.
- Embed: Copies and embeds the selected components and their sub-components into their owner assembly.
- Extract: Extracts the component to a new standalone model that replaces the embedded component in the assembly.
- Make Inseparable: Embeds the lower-level components into the selected assembly.
- Make Separable: Extracts the embedded components from the selected assembly.
- Create Embedded: Creates a new embedded component in the assembly.
Let us know in the comment section if we miss any other ways you figured out to Convert Assembly into a part.

Leave a Reply