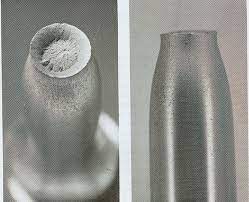
In the previous article, we have discussed the different types of fracture. Ductile fracture and brittle fracture are the broad classifications of fractures. In this article, we will discuss how to calculate Fracture Toughness in metals to avoid failure.

As we have discussed in the previous article, ductile fractures may occur in metals due to overloading of the component and brittle fracture occurs because of the existence of defects in the metal due to forming of the material or fabrication process.

Completely eliminating either of these two fractures was impossible. Somehow we need to make sure the existed crack can withstand some of the load and avoid failure. So we must know how to calculate Fracture Toughness in metals to avoid failure.
Fracture Toughness
The critical value of the stress-intensity factor that causes failure of the metal component is called fracture toughness. In order to obtain the Fracture toughness property of any metal, we need to conduct an Impact test and find out the stress intensity factor.
Impact tests such as the one previously described give useful comparative quantitative data with relatively simple test specimens and equipment. However, these tests do not provide proper data for design purposes for material sections containing cracks or flaws.
Data of this type are obtained from the discipline of fracture mechanics in which theoretical and experimental analyses are made of the fracture of structural materials containing pre-existing cracks or flaws.
In this article, we will focus on the fracture toughness property of fracture mechanics and show how it can be applied to calculate the fracture toughness for some simple component designs.
The fracture of metal starts at a place where the stress concentration is the highest, which may be at the top of a sharp crack.
Example
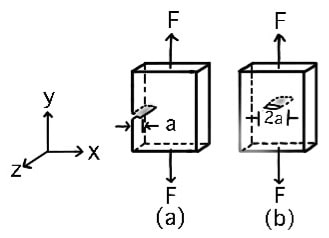
Let us consider a plate sample under uniaxial tension that contains an edge crack or a center through the crack as shown below.

(a) with an edge crack a
(b) With center crack 2a
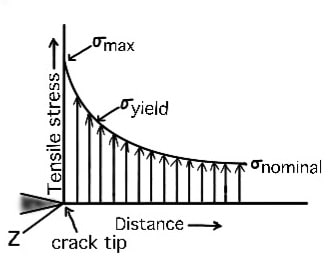
The stress at the tip of a sharp crack is highest at the tip as indicated below figure.

The stress is a maximum at the crack tip
The stress intensity at the crack tip is found to be dependent on both the applied stress and the width of the crack.
We use the stress-intensity factor KI to express the combination of the effects of the stress at the crack tip and die crack length. The subscript I (pronounced “one”) indicates mode I testing in which tensile stress causes the crack to open.
By experiment, for the case of uniaxial tension on a metal plate containing an edge or internal crack (mode I testing), we found that
KI = Y σ √(πa)
KI = stress-intensity factor
σ = applied nominal stress
a = edge crack length or half the length of an internal through the crack
Y = dimensionless geometric constant of the order of 1
The critical value of the stress-intensity factor that causes failure of the plate is called the fracture toughness KIC, (pronounced “kay-one-see”) of the material.
In terms of the fracture stress σf and the crack length a for an edge crack or one-half of the internal crack length.
We can write the fracture toughness from the above stress intensity factor is as follows.
KIC = Y σf √(πa)
From this relation, we can calculate the Fracture Toughness of any metal.
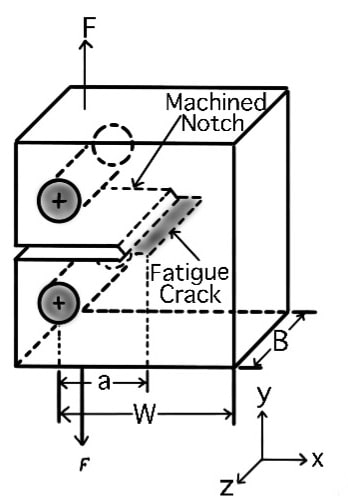
Fracture toughness (KIC) values have the SI units of MPa √m. Following is a schematic diagram of the compact type of fracture-toughness test specimen.

- To obtain constant values for KIC, the base dimension B of the specimen must be relatively large compared to the notch-depth dimension a so that so called plain-strain conditions prevail.
- Plain-strain conditions require that during testing there is no strain deforma- tion in the direction of the notch (in the z direction of as shown in the above schematic).
- Plain-strain conditions generally prevail when B (specimen thickness) =2.5 (KIC/yieldstrength).
- Note that the fracture-toughness specimen has a machined notch and a fatigue crack at the end of the notch of about 3 mm depth to start the fracture during the test.
Fracture Toughness values for selected Engineering Alloys
Fracture-toughness values of materials are most useful in mechanical design when working with materials of limited toughness or ductility such as high-strength aluminum, steel, and titanium alloys. The following table lists some KIC values for some of these alloys.
| Material | KIC MPa √m | σyield strength MPa |
| Aluminum alloys: | ||
| 2024-T851 | 26.4 | 455 |
| 7075-T651 | 24.2 | 495 |
| 7178-T651 | 23.1 | 570 |
| Titanium alloy: | ||
| Ti-6Al-4V | 55 | 1035 |
| Alloy steels: | ||
| 4340 (low-alloy steel) | 60.4 | 1515 |
| 17-7 pH (precipitation hardening) | 76.9 | 1435 |
| 350 maraging steel | 55 | 1550 |
(Source: Source: “Deformation and Fracture Mechanics of Engineering Materials,” 3rd ed.)
Materials that show little plastic deformation before fracture have relatively low fracture toughness KIC values and tend to be more brittle, whereas those with higher KIC values are more ductile.
Fracture-toughness values can be used in mechanical design to predict the allowable flaw size in alloys with limited ductility when acted upon by specific stresses. The factor of safety is also applied for added safety.
Let us solve an example problem to calculate Fracture Toughness in metals to illustrate the design approach.
Example Problem to calculate Fracture Toughness
A structural plate component of an engineering design must support 207 MPa in tension. If aluminum alloy 2024-T85 l is used for this application, what is the largest internal flaw size that this material can support? (Use Y = I).
Answer:
We know the Fracture toughness formula KIC = Y σf √(πa)
Where
σf = fracture stress
a = edge crack length or half the length of an internal through the crack
Y = dimensionless geometric constant of the order of 1
From the above-given table, KIC = 26.4 MPa √m,
Let us substitute all the values in the above Fracture toughness formula
KIC = Y σf √(πa)
26.4 MPa √m = 1 × 207 MPa × √(πa)
Solving this we will get a = 0.00518 m = 5.18mm
Thus, the largest internal crack size that the plate can support is 2a, or (2)(5.18 mm) = 10.36 mm.
Conclusion
This is how we can calculate the allowable crack size. If we have all the other parameters, we can find out the fracture toughness also can be found. But we do not need to calculate the fracture toughness. For all the engineering alloys Fracture Toughness has been already found out and specified in the design handbooks. Let us know what do you think about this article in the comment section below.

Leave a Reply