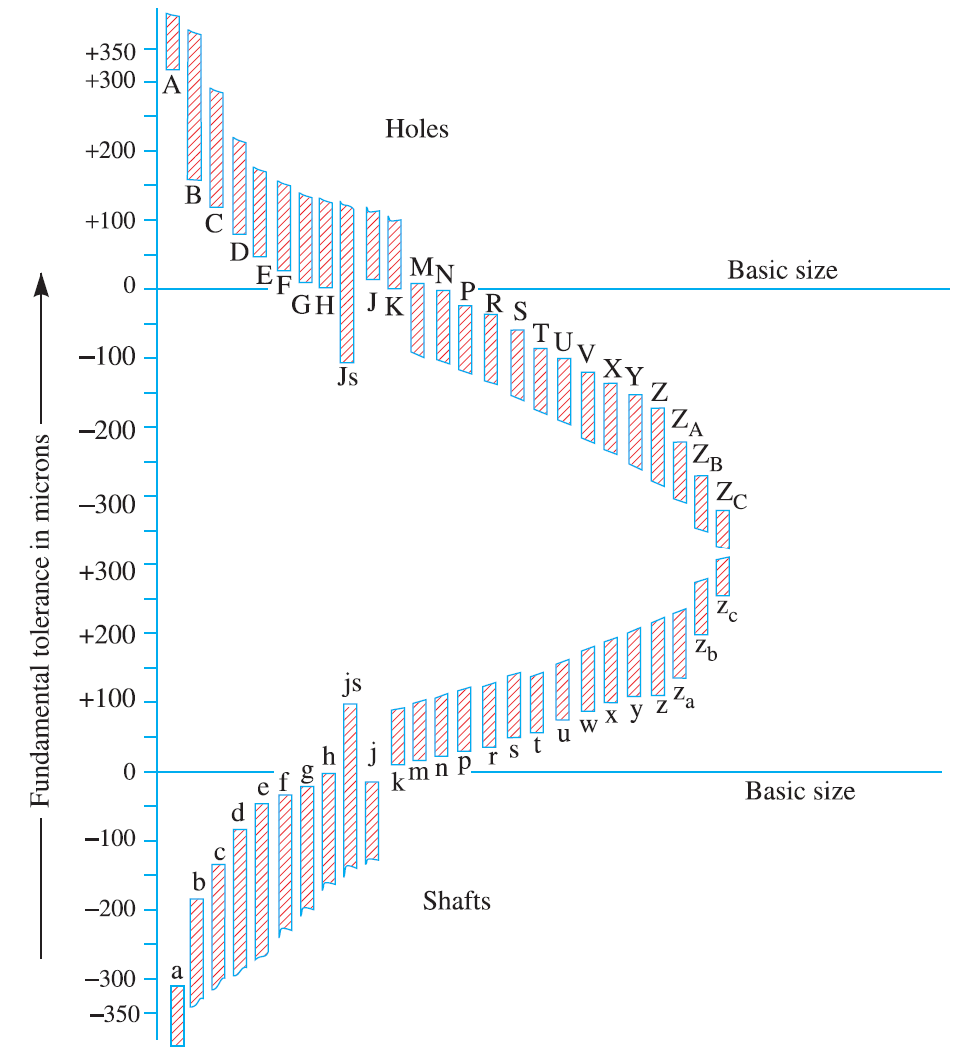
Fundamental Deviation of shaft and holes– Fundamental deviation is an allowance rather than tolerance. The allowance is simply the deviation between the hole minimum diameter to the shaft maximum diameter. Where the tolerance refer to either hole (Max. dia of hole-Min. Dia. of the hole) or shaft (Max. Dia. of the shaft- Min. Dia. of the Shaft). There are 25 fundamental deviations are there to fit the shaft in a hole with these 25 allowable deviations.

Fundamental Deviations of Shafts and Holes
All these 25 deviations are represented with the alphabets. These alphabets are case-sensitive. Block letters are used to represent the hole and small letters are used to represent the shaft deviations. all these deviations are in micrometres(Microns)
Holes deviations: A, B, C, D, E, F, G, H, JS, J, K, M, N, P, R, S, T, U, W, X, Y, Z, ZA, ZB, ZC
Shafts deviations: a, b, c, d, e, f, g, h, js, j, k, m, n, p, r, s, t, u, w, x, y, z, za, zb, zc
See the following schematic representation of the Fundamental deviation of Holes and shafts (Fundamental Deviation Chart)

With these, we use the different type of combinations of hole and shaft fits based on their function.
Example
A Shaft designation is given as 40H8/f7
H8 = Hole deviation with the international tolerance grade 8 (IT8)
f7 = Shaft deviation with the international tolerance grade 7 (IT7)
But how we can figure out the tolerances for the given shaft diameter?
Here we go!
International Tolerance Grades
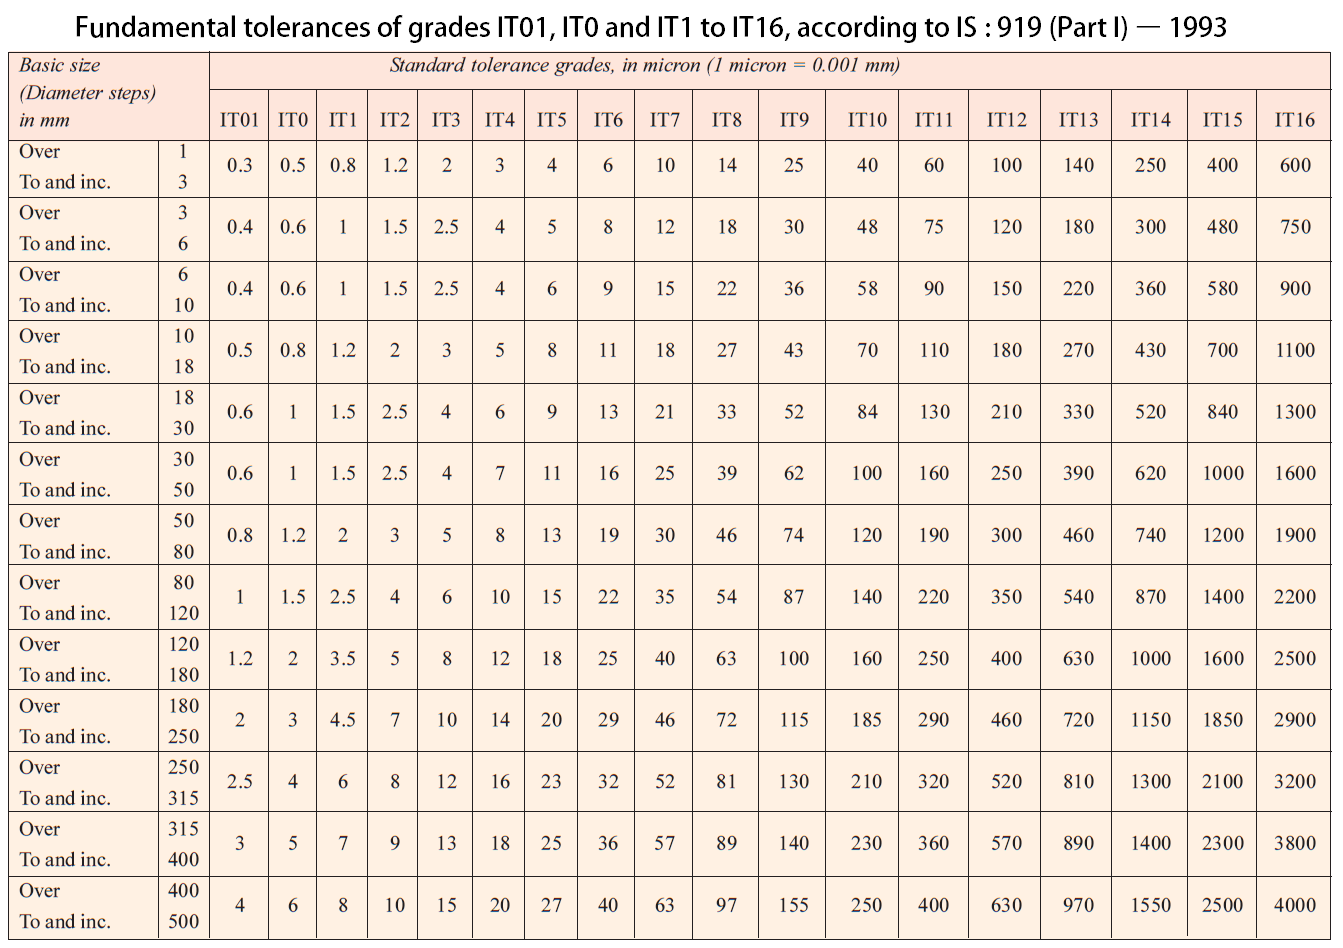
We have 18 International Tolerance(IT) grades. These grades determine the tolerances for the given designated shaft value.
IT01, IT0, IT1, IT2, IT3, IT4, IT5, IT6, IT7, IT8, IT9, IT10, IT11, IT12, IT13, IT14, IT15, IT16.
These are the standard tolerance grades. These tolerance values will be calculated with the help of the relevant magnitude given below.
| Tolerance Grade | IT5 | IT6 | IT7 | IT8 | IT9 | IT10 | IT11 | IT12 | IT13 | IT14 | IT15 | IT16 |
| Magnitude | 7i | 10i | 16i | 25i | 40i | 64i | 100i | 160i | 250i | 400i | 640i | 1000i |
Where
![]()
D = Geometric mean diameter in mm
The following list will demonstrate where these grades are applied according to their tolerance range in a particular application.
IT01 to IT4 – For the production of gauges, plug gauges, measuring instruments
IT5 to IT 7 – For fits in precision engineering applications
IT8 to IT11 – For General Engineering
IT12 to IT14 – For Sheet metal working or press working
IT15 to IT16 – For processes like casting, general cutting work
Fundamental tolerances of grades according to the IS: 919 – 1993

Conclusion
This information gives you a basic idea of what are the fundamental deviations and what are the standard tolerance grades. But in fur these we need to know about how this fundamental deviation or a tolerance grade can be calculated based on the given designated value.
And here is

Limit and fit tolerance