Fundamental deviation Calculations: The fundamental deviation is an allowance rather than tolerance. The allowance is simply the deviation between the hole minimum diameter to the shaft maximum diameter. Where the tolerance refer to either hole (Max. dia of hole-Min. Dia. of the hole) or shaft (Max. Dia. of the shaft- Min. Dia. of the Shaft). There are 25 fundamental deviations are there to fit the shaft in a hole with these 25 allowable deviations. [Continue reading about the 25 fundamental Deviations]

With continuing to this article: Fundamental deviations for shaft and holes We have discussed some example problems here. Refer the mentioned article to understand the Fundamental deviation and the Tolerances. If familiar with the Fundamental deviations and tolerances concepts proceed with the following example problem.
Problem: Calculate the Tolerances, Fundamental Deviation and limits of sizes for the hole and Shaft designated to 25H8/d9
Answer:
Given Data = Shaft designated to 25H8/d9
This means the basic size is 25 and the tolerance grade for the hole is 8(i.e IT8) and the shaft tolerance grade is 9 (i.e. IT9)
(What are these IT grades?) Check them here!
Tolerances Calculation based on the Tolerance grades
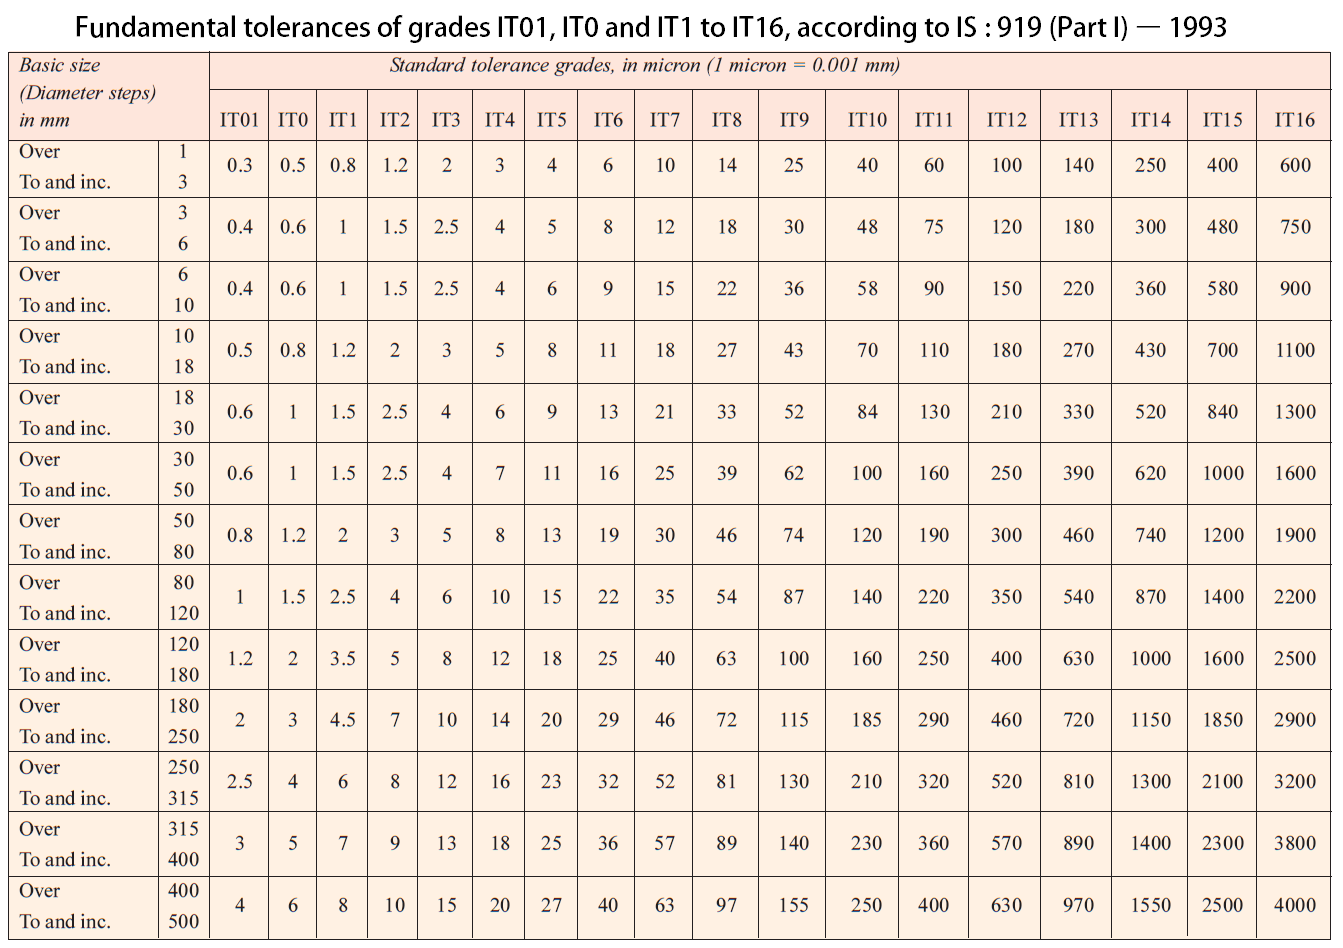
The given basic size is lies between 18 and 30
(Check the following table for the standard deviations. These can be calculated as follows in below)

The geometric mean diameter is
D =√(18×30) = 23.24 mm
The standard tolerance unit is
![]()
∴ Where D =The geometric mean diameter
i = 0.45 ∛(23.24) + 0.001 x 23.24
i = 0.45 x 2.854 + 0.02324
i = 1.3074 (In microns)
i = 1.3074 x .001 = 0.0013074 mm
The relative magnitudes for the tolerance grades from the below table
| Tolerance Grade | IT5 | IT6 | IT7 | IT8 | IT9 | IT10 | IT11 | IT12 | IT13 | IT14 | IT15 | IT16 |
| Magnitude | 7i | 10i | 16i | 25i | 40i | 64i | 100i | 160i | 250i | 400i | 640i | 1000i |
Tolerances for Hole grade (IT8) = 25i = 25 x 0.0013074 = 0.033mm
Tolerances for Shaft grad (IT9) = 40i = 40 x 0.0013074 = 0.052mm
These are the tolerances we are going to use for the hole and shaft respectively. These can be directly seen from the table mentioned in the above table [Check this article for more info: International Tolerance Grades]
Fundamental Deviation Calculations
a) Fundamental Deviation Calculations for the Hole

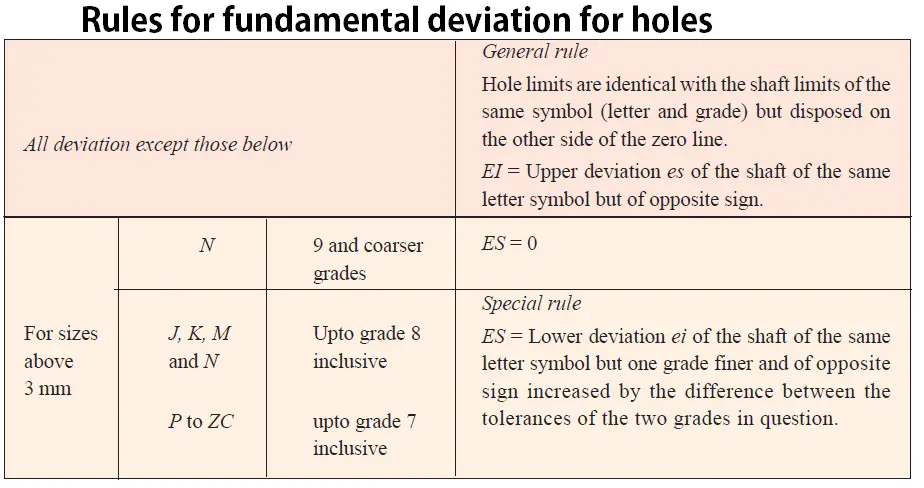
In this case, The designated hole is “H”
The Lower deviation (EI) of the hole always be zero
EI = 0
The upper deviation is represented by ES
∴ where EI = ES – IT (or) ES = EI + IT
ES = 0 + 0.033 (∴ where in this case grade 8 = 0.033mm from above)
ES = 0.033mm
Therefore Hole tolerance can be calculated as
The lower limit for the hole = Basic size + Hole Lower deviation = 25 + 0 = 25.000mm
The upper limit for the hole = Basic size + Hole Upper deviation = 25+ 0.033 = 25.033mm
b) Fundamental Deviation Calculations for the Shaft

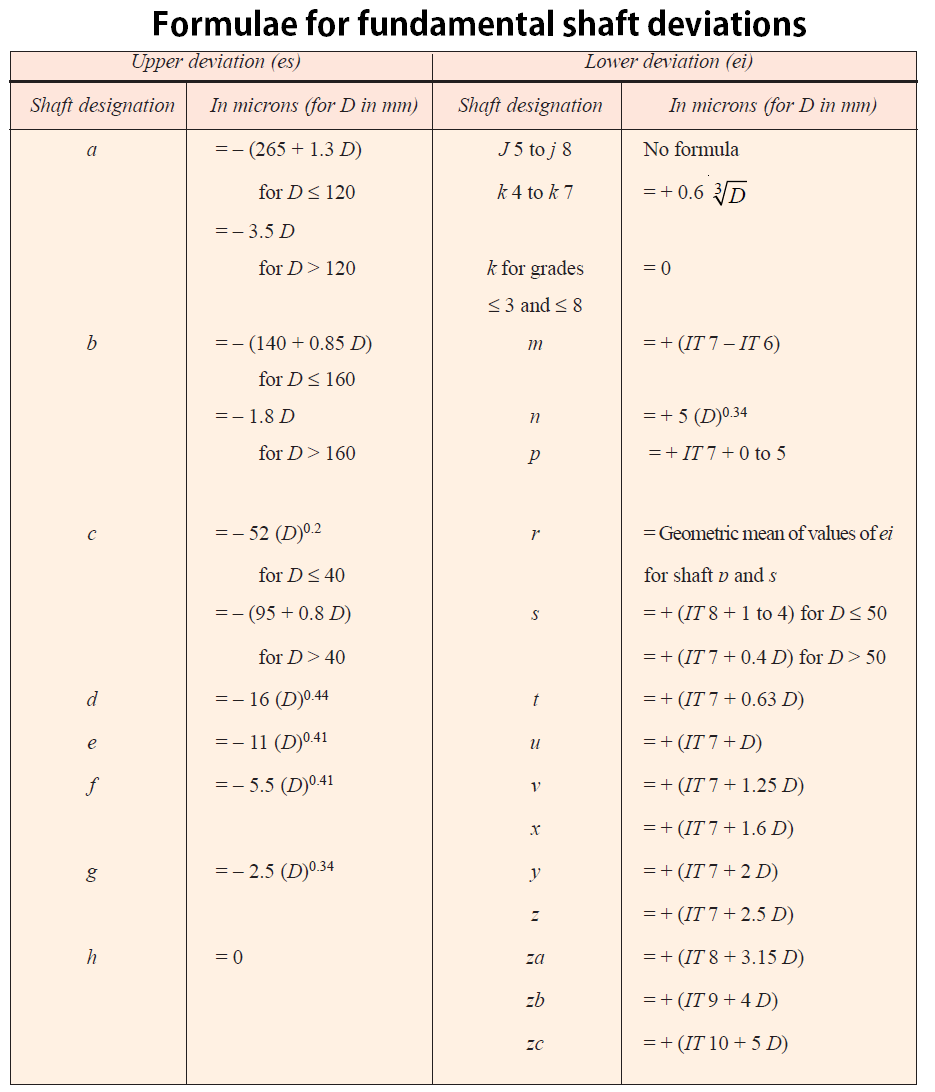
In this case, the designated shaft is “d”
From the above table The upper deviation(es) for the shafts is = -16 (D)0.44
es = -16 (23.24)0.44
es = -16 x 3.9915
es = -63.86 microns
es = -63.86 x 0.001 mm
es = -0.064mm
The lower deviation (ei) can be calculated form the following relation
ei = es – IT (or) es = ei + IT
ei = -0.064 – 0.052
ei = -0.116mm
Therefore Shaft tolerance can be calculated as
The lower limit for the Shaft = Basic size + Shaft Lower deviation = 25 + (-0.116) = 24.884mm
The upper limit for the Shaft = Basic size + Shaft Upper deviation = 25+ (-0.064) = 24.936mm
Conclusion
This is how we can calcculate the fundamental deviation and the tolerance limits for the designated shafts and holes. Also check this aricke to understand the International tolerance grades and Indian Standard system of limits and fits.

Thanks a lot for making it easier to understand!
Thanks